Android Integration Guide
This page provides step-by-step instructions for integrating the Vesta Platform with your Android mobile app, and describes known issues and common problems that you might encounter during development. During the integration, you will perform the following actions:
- Integrate the Libraries - Add Vesta’s libraries to your project.
- Initialize the Data Collector - Call the data collector start method to begin tracking your user’s behavior.
- Provide Location Data - If you choose to track your user’s location, send Vesta the latitude and longitude from the device.
- Implement Data Collector - Add tags to the UI elements of your application so that Vesta can watch them for indications of fraud.
- Track Shopping Cart Actions - Notify Vesta when you customer adds or removes items from the shopping cart.
- Evaluate the Transaction - Obtain a risk evaluation from Vesta and decide whether to submit the transaction for payment or cancel the transaction.
Download the Library
Click here to download the Android SDK. If the download does not start automatically, on Windows, right click the link, or on Mac, hold the Control key and click the link. Then, select Save link as… from the menu that opens.
Integrate the Libraries
1. Add the library to your project
Follow the steps below to add the SDK to your project:
-
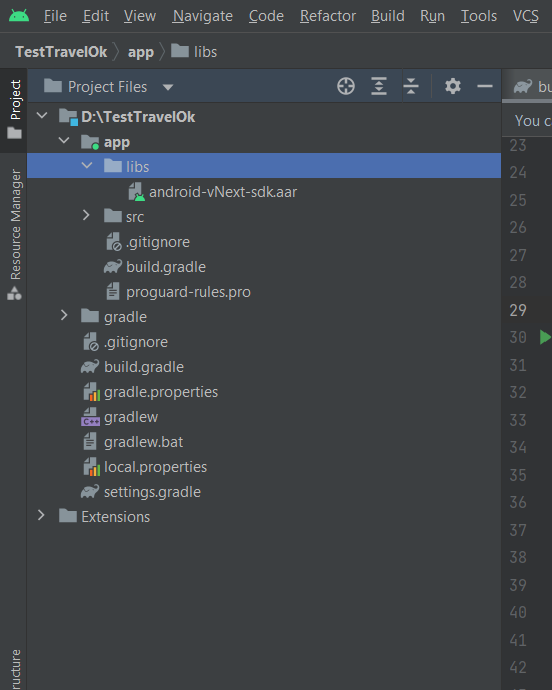
In Android Studio, select the Project Files view from the drop-down list.
-
Expand the application module directory to navigate to the “libs” folder. The application module directory is commonly called
app. -
Locate the “android-vNext-sdk.aar” file on your computer and copy it.
-
Paste the file in the “libs” folder in your project in Android Studio:
-
Add the following line to your “app/build.gradle” file:
implementation fileTree(dir: "libs", include: ["*.aar"])
2. Set the dependencies
Declare the dependencies in your main app file. The file is commonly called :app.
For apps running on anything more recent than Android 5.0, add the following dependencies:
// Dependencies required by the Vesta Data Collector SDK
implementation "androidx.lifecycle:lifecycle-livedata-ktx:2.3.0-alpha03"
implementation "com.squareup.okhttp3:logging-interceptor:4.7.2"
implementation "com.squareup.okhttp3:okhttp:4.7.2"
implementation 'com.squareup.retrofit2:converter-gson:2.7.2'
implementation 'com.squareup.retrofit2:retrofit:2.7.2'
implementation "org.jetbrains.kotlinx:kotlinx-coroutines-android:1.3.7"
//  Adding the Kotlin standard library as a dependency
//  does not add Kotlin support to your project nor does it
//  pose any restrictions to the language you are using.
//  This is a regular library dependency.
implementation "org.jetbrains.kotlin:kotlin-stdlib-jdk7:1.3.72"
implementation "com.github.fingerprintjs:fingerprintjs-pro-android:v2.0"
For apps running on Android 5.0 or earlier, use the following dependencies:
// Dependencies required by the Vesta Data Collector SDK
implementation "androidx.lifecycle:lifecycle-livedata-ktx:2.3.0-alpha03"
implementation "com.squareup.okhttp3:logging-interceptor:4.7.2"
implementation "com.squareup.okhttp3:okhttp:3.12.12"
implementation "com.squareup.retrofit2:converter-gson:2.7.2"
implementation "com.squareup.retrofit2:retrofit:2.5.0"
implementation "org.jetbrains.kotlinx:kotlinx-coroutines-android:1.3.7"
//  Adding the Kotlin standard library as a dependency
//  does not add Kotlin support to your project nor does it
//  pose any restrictions to the language you are using.
//  This is a regular library dependency.
implementation "org.jetbrains.kotlin:kotlin-stdlib-jdk7:1.3.72"
implementation "com.github.fingerprintjs:fingerprintjs-pro-android:v2.0"
3. Set the compile options
If you have not already set the compile options for your project, add the following compileOptions block inside the android block:
android {
    // ...
    compileOptions {
        sourceCompatibility JavaVersion.VERSION_1_8
        targetCompatibility JavaVersion.VERSION_1_8
    }
}
Initialize the Data Collector
Initialize the Data Collector at the beginning of your app flow so that it can report the data that it tracks to Vesta.
At the beginning of your app flow, call the authenticateUser function to initialize the service. The function requires the following parameters:
| Parameter Name | Type | Description |
|---|---|---|
| UserName | String | Your Vesta account user name provided by Vesta Customer Success. |
| SecretKey | String | You secret key, obtained from the Vesta Console. |
| CustomerName | String | The customer name. |
| SandboxEnabled | Boolean | Set this value to true to use the sandbox environment. |
| Region | Enum | The region in which your business operates: US or APAC. |
The sample code below shows how to call the authenticateUser function:
VestaDataCollector.authenticateUser(getApplication(), "user-name", "'secret-key", "customer-name", false, Region.US, sessionKey -> {
           if (!sessionKey.isEmpty()) {
               System.out.println("Datacollector service initialized successfully.");
           }
       });
Development Environments: The user name and secret key are specific to the development environment. For development, use your sandbox credentials, then swap them with your production credentials when your app goes live.
The completion handler returns a transactionId which is used in subsequent function calls. If the completion handler returns an empty transactionId field, the service did not initialize properly, and you should handle the error.
Provide location data
If you choose to track your customer’s location, use the VestaDataCollector.sendLocationData() method to send the latitude and longitude values from your user’s device to Vesta. Vesta uses the location data to augment our fraud detection and risk analysis. Tracking location data is optional. If you choose not to track location, proceed to the Implement Data Collector section.
The table below defines the parameters that you must pass to the VestaDataCollector.sendLocationData() method:
| Parameter Name | Description | Type |
|---|---|---|
| latitude | The latitude value obtained from your customer’s device. | Double |
| longitude | The longitude value obtained from your customer’s device. | Double |
The code below provides an example of how to call the sendLocationData() method:
VestaDataCollector.sendLocationData(37.4219999, -122.0862515);
Implement Data Collector
To implement Data Collector, tag UI elements so that Vesta can track your customer’s behavior. To tag elements in your app, you will use a custom class when you create text fields, buttons, and spinners in your application’s files, then assign one of Vesta’s predefined tags to the element.
The sections below provide details about tagging text fields, buttons, spinners, and screens.
A complete list of the field tag values is available in the Tag Reference section at the bottom of this page.
Text field tagging
Text field tagging identifies the the text fields that Vesta will watch to track your customer’s behavior. The information below describes how to implement text field tagging in your Android app:
- When defining UI elements in your application’s layout XML files, use Vesta’s
TrackingEditTextclass instead of the standardEditTextclass. - Add the property
app:tracking_tagto theTrackingEditTextobject definition and assign one of the Vesta-defined values for field tagging. The complete list of field tags is available in the Field Tags section of the Tag Reference at the end of this page.
The code below shows an example of the TrackingEditText object with the app:tracking_tag attribute value set to LoginID:
<?xml version="1.0" encoding="utf-8"?>
<androidx.constraintlayout.widget.ConstraintLayout xmlns:android="http://schemas.android.com/apk/res/android"
    xmlns:app="http://schemas.android.com/apk/res-auto"
    android:layout_width="match_parent"
    android:layout_height="match_parent">

    <com.vesta.vestalibrary.dc.widget.TrackingEditText
        android:id="@+id/emailEditText"
        app:tracking_tag="LoginID" />

</androidx.constraintlayout.widget.ConstraintLayout>
It is possible to add TrackingEditText objects to your UI programmatically by searching for the appropriate field and assigning the correct values to the object’s attributes. The code below provides an example of using Constrain Layout as the root container to implement field tagging programmatically:
@Override
protected void onCreate(Bundle savedInstanceState) {
    super.onCreate(savedInstanceState);
    setContentView(R.layout.activity_main);

    // Create the TrackingEditText with code
    TrackingEditText trackingEditTextPassword = new TrackingEditText(this, TrackingTag.Password);
}
Button tagging
Button tagging enables Vesta to track the actions associated with button taps in your app. The steps below describe how to add a TrackingButton to your layout:
- Create a button in your layout XML file and assign the
TrackingButtonclass. - Add the property
app:tracking_actionto the object definition and assign one of the Vesta-defined values for tracking actions. The complete list of tracking actions is available in the Tracking actions section of the Tag Reference at the end of this page.
The code below shows an example of how to add a TrackingButton to your layout file:
<?xml version="1.0" encoding="utf-8"?>
<androidx.constraintlayout.widget.ConstraintLayout xmlns:android="http://schemas.android.com/apk/res/android"
    xmlns:app="http://schemas.android.com/apk/res-auto"
    android:layout_width="match_parent"
    android:layout_height="match_parent">

<com.vesta.vestalibrary.dc.widget.TrackingButton
    android:id="@+id/trackingButton"
    android:text="@string/track"
    app:tracking_action="LoginAttempt"/>
</androidx.constraintlayout.widget.ConstraintLayout>
The code below shows an example of creating a TrackingButton programmatically:
@Override
protected void onCreate(Bundle savedInstanceState) {
    super.onCreate(savedInstanceState);
    setContentView(R.layout.activity_main);

    // This is the way to initialize the Tracking button with code
    TrackingButton trackingButton = new TrackingButton(this, ButtonTrackingAction.LoginAttempt);
}
Spinner tagging
Spinner tagging lets Vesta track customer behavior related to spinners used in your app. The steps below describe how to add a TrackingButton to your layout:
- Create a spinner in your layout XML file using the
trackingSpinnerclass. - Add the property
app:spinner_tracking_tagto the object definition and assign one of the Vesta-defined values for spinner tagging. The complete list of spinner tags is available in the Spinner Tags section of the Tag Reference at the end of this page.
The code below shows an example of how to add a trackingSpinner to your layout file:
<?xml version="1.0" encoding="utf-8"?>
<androidx.constraintlayout.widget.ConstraintLayout xmlns:android="http://schemas.android.com/apk/res/android"
    xmlns:app="http://schemas.android.com/apk/res-auto"
    android:layout_width="match_parent"
    android:layout_height="match_parent">

<com.vesta.vestalibrary.dc.widget.TrackingSpinner
    android:id="@+id/trackingSpinner"
    app:spinner_tracking_tag="PurchaseCardExpirationDateMonth" />
</androidx.constraintlayout.widget.ConstraintLayout>
The code below shows an example of creating a trackingSpinner programmatically:
@Override
protected void onCreate(Bundle savedInstanceState) {
    super.onCreate(savedInstanceState);
    setContentView(R.layout.activity_main);

    // This is the way to initialize the Tracking button with code
    TrackingSpinner spinner = new TrackingSpinner(this, TrackingTag.PurchaseCardExpirationDateYear);
}
Screen tagging
Screen tagging enables Vesta to track user navigation and view time on each screen of your app.
Track Shopping Cart Actions
Use the transactionEvent method to notify Vesta when your customer adds, updates, or removes items from the shopping cart. The trasactionEvent method takes product details, event type, and a completion handler as inputs and returns a transaction ID if the operation was successful.
The eventType parameter defines the cart action and takes one of the following values: add, update, or remove.
The code below shows adding an item to the cart:
let vestaManager = VestaManager()
vestaManager.transactionEvent(productCode: product.id, quantity: Cart.cartItem.count, normalAmount: product.productPrice, normalCurrencyCode: "USD", discountAmount: 0.0, discountCurrencyCode: "USD", giftCard: false, productType: "Virtual", uniqueCartID: "AIV90687S980SV", productDescription: product.productDescription, eventType: "add", completionHandler: {
  result in
  if !result.isEmpty {
    DispatchQueue.main.async {
      print("Transaction event == ", result)
    }
  }
})
Evaluate the Transaction
When your customer is ready to check out, use the one of the transaction evaluation methods to obtain fraud analysis from Vesta. The results of the analysis depend on whether you are using Payment Guarantee or Payment Protect.
You can run one-step or two-step transaction evaluations.
One-step
For one-step transaction flows, send the transaction to your payment gateway for authorization, then use the submitCompleteTransactionsPostAuth method to send transaction information to Vesta, as shown below:
if (authType == AuthType.SINGLE_STEP) {
  ApiCall.getInstance(order_placing.this)
    .submitCompleteTransactionsPostAuth(order_placing.this, customData, "AIV90687S980SV", orderNumber, "COMPLETE", cartViewModel.getCartTotal(), 0.00, "USD", paymentsObject, shippingList, authType, guaranteeable, edtScore.getText().toString(), postAuthTransactionResponse -> {
      if (postAuthTransactionResponse != null) {}
    });
}
You will include the response from your payment gateway in the payment object in the parameters. Set the value of authType to AuthType.SINGLE_STEP.
See the /transactions/evaluate/{transaction_id} definition in the API Reference for definitions of the values each parameter takes.
The result of the method depends on the Vesta product you are using:
- Payment Guarantee - You will receive a Guaranteed or Not Guaranteed decision in the result. You can choose whether to submit the transaction to your gateway for payment. If you submit a transaction that is Not Guaranteed for payment, Vesta will not cover the cost of any associated chargeback.
- Payment Protect - You will receive a score, insights, and a risk band, which you can use to determine whether to submit the transaction to your gateway for payment or cancel the transaction because it is too risky.
Two-step
For two-step transaction flows, submit the transaction to Vesta for analysis before submitting it to your gateway for authorization. Based on Vesta’s response, you can choose whether to submit the transaction for authorization. Once you have obtained an authorization decision from your gateway, submit the transaction to Vesta for analysis a second time, with the auth response included in the data. Vesta will return an updated decision that you can use to decide whether to submit the transaction for payment.
For the initial transaction analysis, use the completeTransactionPostAuthFallowedByPreAuth method, as shown below:
if (authType == AuthType.PRE_AND_POST_AUTH) {    ApiCall.getInstance(order_placing.this).submitCompleteTransactionsPostAuthFollowedByPreAuth(order_placing.this, customData, "AIV90687S980SV", orderNumber,
    "COMPLETE", cartViewModel.getCartTotal(), 0.00, "USD",
    paymentsObject, shippingList, authType, guaranteeable, edtScore.getText().toString(), preAuthTransactionResponse -> {
      if (preAuthTransactionResponse != null) {}
    });
}
Set the authType to AuthType.PRE_AND_POST_AUTH.
See the /transactions/evaluate/{transaction_id} definition in the API Reference for definitions of the values each parameter takes.
The response depends on your subscription:
- Payment Guarantee - You will receive a Guaranteeable or Not Guaranteed decision in the result. You can choose whether to submit the transaction to your gateway for authorization.
- Payment Protect - You will receive a score, insights, and a risk band, which you can use to determine whether to submit the transaction to your gateway for authorization or cancel the transaction because it is too risky.
If you submit the transaction for authorization, call the submitCompleteTransactionsPostAuthFollowedByPreAuth again and include the authorization response in the parameters to obtain an updated fraud analysis. Include the auth result in the payment object in the parameters.
The method will return an updated analysis result based on your subscription:
- Payment Guarantee - You will receive a Guaranteed or Not Guaranteed decision in the result. You can choose whether to submit the transaction to your gateway for payment. If you submit a transaction that is Not Guaranteed for payment, Vesta will not cover the cost of any associated chargeback.
- Payment Protect - You will receive an updated score, insights, and a risk band, which you can use to determine whether to submit the transaction to your gateway for payment or cancel the transaction because it is too risky.
Tag reference
Field Tags
| Field Tag | Description |
|---|---|
| LoginID | The user name field of your login form. |
| Password | The password field of your login form. |
| ProductSearch | The text field used to search for products. |
| AddToCart | The button used to add a product to the shopping cart. |
| RemoveFromCart | The button used to remove a product from the shopping cart. |
| TransferRecipient | The text field used to identify the recipient of a transfer payment. |
| TransferSender | The text field used to identify the sender of a transfer payment. |
| TransferToAccount | The text field used to identify the account that will receive the funds from a transfer payment. |
| TransferAmount | The text field used to define the amount of a transfer payment. |
| TransferDate | The text field used to define the date that a transfer payment should be made. |
| BillingFirstName | The text field used to collect the first name of the cardholder. |
| BillingLastName | The text field used to collect the last name of the cardholder. |
| BillingAddressLine1 | The text field used to collect the first line of the cardholder’s billing address. |
| BilllingAddressLine2 | The text field used to collect the second line of the cardholder’s billing address. |
| BillingCity | The text field used to collect the city portion of the cardholder’s billing address. |
| BillingRegion | The text field used to collect the region of the cardholder’s billing address. |
| BillingPostalCode | The text field used to collect the postal code of the cardholder’s billing address. |
| BillingCountryCode | The text field used to collect the country code of the cardholder’s billing address. |
| PurchaseCardNumber | The text field used to collect the customer’s payment card number. |
| PurchaseCardExpirationDateFull | The text field used to collect the expiration date of the customer’s payment card. |
| PurchaseCardExpirationDateMonth | The text field used to collect the month portion of the expiration date of the customer’s payment card. |
| PurchaseCardExpirationDateYear | The text field used to collect the year portion of the expiration date of the customer’s payment card. |
| PurchaseCardCVV | The text field used to collect the CVV number associated with the customer’s payment card. |
| PurchaseAlternateAccount | The text field used to define an alternate payment method for the purchase. |
| DeliveryMethod | The UI element used to select the shipping method. |
| DeliveryRecipient | The text field used to collect the name of the person who will receive the shipment. |
Tracking Actions
| Tracking Action | Description |
|---|---|
| LoginAttempt | Start this event when your customer clicks the login button. |
| ForgotPassword | Start this event when your customer clicks a button to attempt a password reset. |
| SignUp | Start this event when your customer clicks the button for creating a new account. |
| SignUpAttempt | Start this event when your customer clicks the button for creating a new account, but the credentials have not yet been validated. |
| Search | Start this event when your customer activates the search field or clicks the button to perform a search. |
| AddToCart | Start this event when your customer clicks the button to add a product to the shopping cart. |
| RemoveFromCart | Start this event when your customer clicks the button to remove a product from the shopping card. |
| ShowCart | Start this event when your customer clicks the button to view the contents of the shopping cart. |
| ProceedToCheckout | Start this event when your customer clicks the button to begin the checkout process. |
| ConfirmPaymentMethod | Start this event when your customer clicks the button to confirm the payment method. |
| ConfirmShippingMethod | Start this event when your customer clicks the button to confirm the shipping method. |
| CompleteOrder | Start this event when your customer clicks the button to complete the order. |
Spinner Tags
| Spinner Tag |
|---|
| LoginID |
| Password |
| ProductSearch |
| AddToCart |
| RemoveFromCart |
| TransferRecipient |
| TransferSender |
| TransferToAccount |
| TransferAmount |
| TransferDate |
| BillingFirstName |
| BillingLastName |
| BillingAddressLine1 |
| BillingAddressLine2 |
| BillingCity |
| BillingRegion |
| BillingPostalCode |
| BillingCountryCode |
| PurchaseCardNumber |
| PurchaseCardExpirationDateFull |
| PurchaseCardExpirationDateMonth |
| PurchaseCardExpirationDateYear |
| PurchaseCardCVV |
| PurchaseAlternateAccount |
| DeliveryMethod |
| DeliveryRecipient |