Certification and Testing
The certification process takes you through a self-guided path for developing and testing your Vesta Console integration and moving your site to production once it is approved.
If your team has questions during the Certification process, use the Ready to Certify? button to contact Vesta Support.
Prerequisites
Your organization must complete the following steps prior to Certification:
-
Create a Vesta Account - See the Getting Started page for details. You will receive an email when your Vesta credentials are created. Follow the instructions in the email to log in to the Vesta Console and update your password.
-
Set up your Vesta Account - When you log in for the first time, follow the prompts in the console to update the basic information about your organization.
When you have completed the items above, the certification steps will be displayed in the “Let’s get you onboarded” panel on the right side of the Vesta Console.
Overview
When you are ready to begin the certification process, log in to the Vesta Console, and you will be presented with a module that will walk you through each step needed to be certified by Vesta. The “Let’s get you onboarded” panel, shown below, will allow you to navigate to the step you wish to perform and show you the status and progress of your Certification testing activities:

You must complete the Create your account and Describe your business steps before you can proceed to Testing and Certification.
Test and Certify Your Application
Access the Certification screen from the Console by clicking Testing and Certification in the “Let’s get you onboarded” panel. The screen, shown below, will walk you through the integration process:
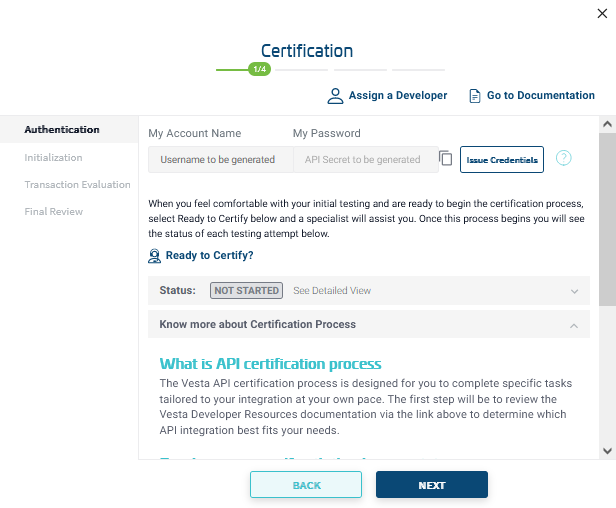
The Certification module will walk you through the integration steps described below:
-
Authentication - During the Authentication step, you will obtain your API credentials and test them using the Vesta REST API or VestaJS scripts. See the Get API Keys section of the Getting Started page for additional details. Select the Issue Credentials button to begin. Your API Account name will be displayed in the Certification module and your Account Name and Password will be emailed to the address used to setup the Vesta Console account. You will receive a separate email each time you issue new API credentials. There is high-level documentation provided in the module, but if you would like more information, you can select the Go to Documentation link and you will be directed to our API resources.
Warning: Save these credentials securely. If you lose or forget the password, it must be changed and your application will have to be updated.
Once you have stored your credentials, run the Access Token and Refresh Token API operations or the
VestaExtensionJs.setAuthenticationfunction to ensure that your credentials are valid and your connection to Vesta is working. -
Initialization - Develop and test the shopping cart portions of your integration. See the Direct API Initialization or JavaScript Initialization sections of the integration guides for details about initializing the Vesta Platform in your application.
-
Transaction Evaluation - Send a transaction to Vesta for evaluation and review the response described in Direct API Transaction Evaluation and JavaScript Transaction Evaluation.
-
Final Review - When you have completed the steps above, click Next in the Final Review step to notify Vesta that your application is ready to be approved. Vesta will ask you to run several test transactions, and we will evaluate the transaction data and the behavioral and device data that we receive from your site. When your application is fully certified, Vesta will issue your production credentials, at which point your application will be ready to go live.
Add a developer to the project by clicking the Assign Developer button and selecting the appropriate Vesta user account. The developer will be able to access the Certification module and the related development requirements.