Web App Direct API Integration Guide
This page provides all of the information you will need to integrate Payment Guarantee or Payment Protect with your eCommerce site using the Vesta Platform REST API.
We provide the following additional resources to support your Direct API integration:
- Development Environments - Information about the sandbox and production environments supported by the API.
- API Reference - Complete definitions of all of our API endpoints.
- API Reference PDF - A PDF version of the API reference for portability.
Make sure you have all of the prerequisites in place, then follow the steps in the Integration section to add Vesta’s fraud detection to your site.
Prerequisites
Ensure that you have the following items before beginning development:
-
Authentication Credentials - Obtain your API user name and password during the Authentication step of the Certification process. You will use them to request API Keys.
-
Acquirer Documentation - You need access to your acquirer’s documentation so that you can submit transactions directly. Vesta requires information that is returned by your gateway when you submit the transaction for approval, and Vesta may ask you for details about your acquirer’s responses.
Integration
The information below describes how to use the Vesta Platform REST API to integrate Vesta’s fraud prevention into your web app.
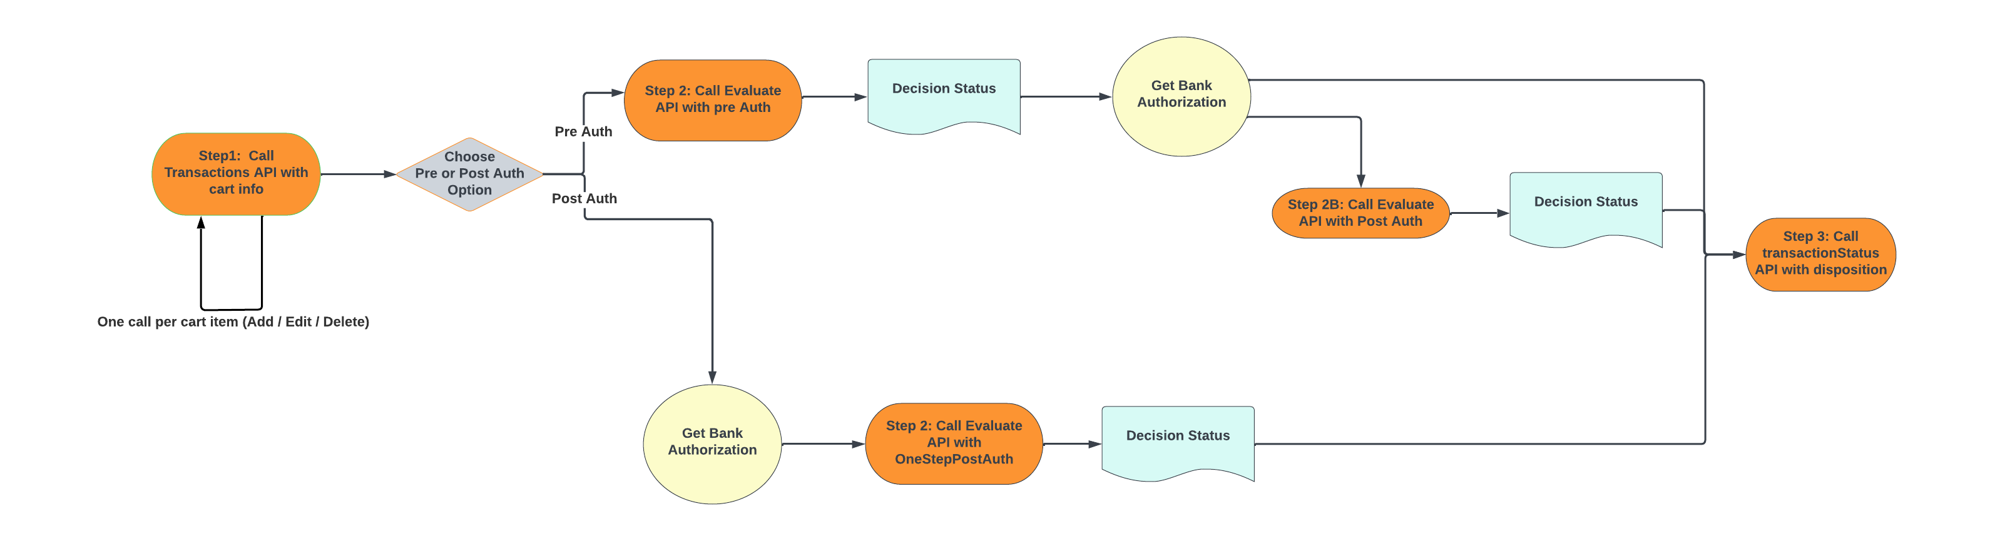
The Vesta Platform supports multiple transaction evaluation workflows:
- Pre-auth Evaluation - Obtain a transaction evaluation from Vesta before submitting the transaction to your gateway for authorization.
- Pre-auth Evaluation with Optional Post-auth Evaluation - Obtain a transaction evaluation from Vesta before submitting the transaction to your gateway for authorization. Then obtain an updated transaction evaluation based on the gateway’s authorization response.
- Post-auth Evaluation - Submit the transaction to your gateway for authorization before requesting a transaction evaluation.
The image below illustrates the pre-auth and post-auth Direct API integration transaction flows:
1. Add the Data Collector script to your master page
Add the following data collector script to the master page of your web app:
<script src="host/js/static/dcextension.js"></script>
It is important to add this <script> tag to your master page so that it is included on every page of your application. Vesta uses it to drive aspects of our transaction evaluation.
When you run your app, you will receive the message “Vesta Data Collector loaded” after the script is loaded.
Vesta’s Behavioral Data Collector improves our risk assessment and fraud detection services. This integration enhances the device and behavioral tracking information we obtain from your application.
2. Generate authentication credentials for your API requests
Every request to the Vesta Platform API requires a valid access token. The steps below describe how to use the /accessTokenand /refreshToken endpoints to obtain and manage the access tokens that you use to authenticate your requests:
Generate an initial access token
When your app first loads, you will need to generate an access token that you will use to authenticate subsequent requests to the API.
Click to expand step-by-step instructions for generating an access token.
- Send a request to the
/accessTokenendpoint with yourapiKeyin the body of the request. YourapiKeyis constructed by concatenating your Account and secret values together separated by a colon character,:, and then encoding them in Base64.
The steps below describe the process:- Get your Account name and secret from the Vesta Console:
Account= “Sandbox”Secret= “1234567890”
- Concatenate the values with a colon as a separator:
Sandbox:1234567890
- Encode the concatenated values using Base64:
U2FuZGJveDoxMjM0NTY3ODkw
- Use the value you generated for the
apiKeyin your request/accessToken:
{
    "apiKey":"U2FuZGJveDoxMjM0NTY3ODkw"
  }
The API returns an access token and a refresh token.
- Get your Account name and secret from the Vesta Console:
- Use the access token in the authorization header of your requests to the API.
The access token has a lifespan of 30 minutes, during which you can use the access token to authenticate requests to the API. When the access token expires, you must use the refresh token to obtain a new access token as described in the Generate a new access token section below.
Generate a new access token from a refresh token
When your access token expires, use the /refreshToken endpoint to generate a new access token/refresh token pair.
Click to expand step-by-step instructions for generating a new access token from a refresh token.
- Send a request to the
/refreshTokenendpoint with the refresh token in the body of the request.
The API returns a new access token and a new refresh token. - Use the new access token to authenticate requests to the API and use the refresh token to generate a new access token if needed. You do not need to use the
/refreshTokenendpoint when your application first loads.
The refresh token has a lifespan of 7 days. After 7 days, you will no longer be able to use the refresh token to generate a new access token. When the refresh token expires, you will need to use your API key to generate a new access token.
3. Initialize the transaction and begin data collection
Use the initiateDC() function to set the development environment and provide merchant-specific information that is used to initialize Vesta’s fraud analysis tools. Initialization returns a transactionId that you will use to identify the transaction in later steps.
Send the following fields with your call to initiateDC():
- customerDomain (required) - The merchant’s domain name.
- environment (required) - The developement environment:
SANDBOXorPRODUCTION. - clientName (optional) - The name returned by the customer name API.
The code below shows an example of a call to the initiateDC() function:
window.VestaDataCollector.initiateDC(
   'myCustomer.com',
   'SANDBOX',
   'mycustomerName'
)
Capture the transactionId returned by the function for use in later steps.
Using the SANDBOX Environment
If you set the environment to SANDBOX using the initiateDC() function, be sure to use the /sandbox endpoints when sending requests to the API.
4. Capture transaction events
Every time a customer adds, updates, or removes items from a shopping cart, send a PUT request to the /transactions/{transactionID} endpoint with the shopping cart data in the body of the request:
{
  "ProductCode": "string",
  "ProductDescription": "string",
  "Quantity": 0,
  "Amount": {
    "amount": 0,
    "currencyCode": "string"
  },
  "EventType": "string",
  "Discount": {
    "amount": 0,
    "currencyCode": "string"
  },
  "GiftCard": true,
  "ProductType": "string",
  "UniqueCartId": "string"
}
See the /transactions/{transactionId} endpoint definition for details.
5. (Optional) Resume the Session
If your app uses multiple pages, or if you need to reload the page for any reason, call the window.VestaDataCollector.resume() function to restart data collector. The function accepts an optional transactionId argument, which you can send to identify the transaction that you want to resume. If you do not send the transactionId, the value will default to the value stored in cache. If it is supplied, it must match the value in cache.
The resume() function is asynchronous and returns a transaction session id as a string or an error. Access the result using an async-await or a then callback as shown in the examples below:
window.VestaDataCollector
  .resume(1234567890)
  .then(transactionId => console.log(transactionId))
  .catch(()=> console.log('There is no transaction id!'))
try {
  const transactionId = await window.VestaDataCollector.resume(1234567890)
  if(transactionId) console.log(transactionId)
} catch(ex) {
  console.log('There is no transaction id!')
}
6. Finalize the transaction
Call the window.VestaJSDataCollector.finalize() function without any arguments before submitting the transaction to Vesta for evaluation. The finalize() function initiates collection of device data and prepares the transaction for analysis by Vesta. It is not necessary to wait for the finalize() function to complete before proceeding; however finalize() does support async-away and .then().
7. Evaluate the transaction
When your customer is ready to check out, obtain an evaluation of the transaction risk from Vesta.
The transaction evaluation steps depend on whether you use Payment Guarantee or Payment Protect and whether you want to use a pre-auth or post-auth evaluation flow.
Payment Guarantee
Standard Pre-Auth Flow: Click here to view step-by-step instructions for evaluating a transaction using the standard pre-auth workflow.
-
Send a POST request to the
/transactions/evaluate/{transactionId}endpoint of the Vesta API. Set the value oftransactionEvaluationSteptoPreAuth.Vesta returns a pre-auth decision with one of the following values:
Guaranteeable- Vesta thinks the transaction is safe.Not Guaranteed- Vesta thinks the transaction is risky. You may choose to cancel the transaction to save the processing fees.
-
Based on the response from Vesta, submit the transaction to your payment gateway to obtain authorization from the bank or notify your customer and cancel the transaction.
-
Based on the authorization response from your bank, submit the transaction to the bank for payment or cancel the transaction.
-
Continue with steps 8 and 9 to clear the cache and notify Vesta of the transaction result.
Optional Pre-Auth Flow with Post-Auth Click here to view step-by-step instructions for evaluating a transaction using the standard pre-auth workflow and adding an additional post-auth evaluation.
-
Send a POST request to the
/transactions/evaluate/{transactionId}endpoint of the Vesta API. Set the value oftransactionEvaluationSteptoPreAuth.Vesta returns a pre-auth decision with one of the following values:
Guaranteeable- Vesta thinks the transaction is safe.Not Guaranteed- Vesta thinks the transaction is risky. You may choose to cancel the transaction to save the processing fees.
- Submit the transaction to your payment gateway to obtain authorization from the bank.
-
Send a second POST request to the
/transactions/evaluate/{transactionId}endpoint of the Vesta API. Set the value oftransactionEvaluationSteptoPostAuth. Include the bank’s auth decision with the request.Vesta returns a post-auth decision with one of the following values:
Guaranteed- The transaction is safe. Vesta will cover any costs associated with a chargeback.Not Guaranteed- Vesta will not guarantee the transaction.
- Based on the response, submit the transaction to the bank for payment or cancel the transaction.
- Continue with steps 8 and 9 to clear the cache and notify Vesta of the transaction result.
Post-Auth Flow: Click here to view step-by-step instructions for obtaining a transaction evaluation after receiving an auth decision from your bank.
- Submit the transaction to the bank for authorization and capture the response.
-
Send a POST request to the
/transactions/evaluate/{transactionId}endpoint of the Vesta API with the bank’s authorization reponse in the body. SettransactionEvaluationSteptoOneStepPostAuth.Vesta returns a post-auth decision with one of the following values:
Guaranteed- The transaction is safe. Vesta will cover any costs associated with a chargeback.Not Guaranteed- Vesta will not guarantee the transaction. If you decide to submit the transaction for payment, Vesta will not cover the costs associated with a chargeback. We recommend that you cancel the transaction with the bank.
- Based on the response, submit the transaction to the bank for payment or cancel the transaction.
- Continue with steps 8 and 9 to clear the cache and notify Vesta of the transaction result.
Payment Protect
Standard Pre-Auth Flow: Click here to view step-by-step instructions for evaluating a transaction using the standard pre-auth workflow.
-
Send a POST request to the
/transactions/evaluate/{transactionId}endpoint of the Vesta API. Set the value oftransactionEvaluationSteptoPreAuth.The response includes the following information:
- Score - The risk score is a number from 0 to 100 that indicates how risky the transaction is. A higher number indicates a riskier transaction.
- Insights - Insights give information about why Vesta assigned the risk score. For example, the customer’s phone number may not match the billing address phone number.
- Risk Band - The risk band adds usable information to the risk score and has one of the following values: very safe, safe, moderate, risky, or very risky.
-
Based on the response from Vesta, submit the transaction to your payment gateway to obtain authorization from the bank or notify your customer and cancel the transaction.
-
Based on the authorization response from your bank, submit the transaction to the bank for payment or cancel the transaction.
-
Continue with steps 8 and 9 to clear the cache and notify Vesta of the transaction result.
Optional Pre-Auth Flow with Post-Auth Click here to view step-by-step instructions for evaluating a transaction using the standard pre-auth workflow and adding an additional post-auth evaluation.
-
Send a POST request to the
/transactions/evaluate/{transactionId}endpoint of the Vesta API. Set the value oftransactionEvaluationSteptoPreAuth.Vesta returns a payload with the following information:
- Score - The risk score is a number from 0 to 100 that indicates how risky the transaction is. A higher number indicates a riskier transaction.
- Insights - Insights give information about why Vesta assigned the risk score. For example, the customer’s phone number may not match the billing address phone number.
- Risk Band - The risk band adds usable information to the risk score and has one of the following values: very safe, safe, moderate, risky, or very risky.
- Based on the response from Vesta, submit the transaction to your payment gateway to obtain authorization from the bank or notify your customer and cancel the transaction.
-
Send a second POST request to the
/transactions/evaluate/{transactionId}endpoint of the Vesta API. Set the value oftransactionEvaluationSteptoPostAuth. Include the bank’s auth decision with the request.Vesta returns a payload with the following updated information:
- Score - The risk score is a number from 0 to 100 that indicates how risky the transaction is. A higher number indicates a riskier transaction.
- Insights - Insights give information about why Vesta assigned the risk score. For example, the customer’s phone number may not match the billing address phone number.
- Risk Band - The risk band adds usable information to the risk score and has one of the following values: very safe, safe, moderate, risky, or very risky.
- Based on the response, submit the transaction to the bank for payment or cancel the transaction.
- Continue with steps 8 and 9 to clear the cache and notify Vesta of the transaction result.
Post-Auth Flow: Click here to view step-by-step instructions for obtaining a transaction evaluation after receiving an auth decision from your bank.
- Submit the transaction to the bank for authorization and capture the response.
-
Send a POST request to the
/transactions/evaluate/{transactionId}endpoint of the Vesta API with the bank’s authorization reponse in the body. SettransactionEvaluationSteptoOneStepPostAuth.Vesta returns a payload with the following information:
- Score - The risk score is a number from 0 to 100 that indicates how risky the transaction is. A higher number indicates a riskier transaction.
- Insights - Insights give information about why Vesta assigned the risk score. For example, the customer’s phone number may not match the billing address phone number.
- Risk Band - The risk band adds usable information to the risk score and has one of the following values: very safe, safe, moderate, risky, or very risky.
- Based on the response, submit the transaction to the bank for payment or cancel the transaction.
- Continue with steps 8 and 9 to clear the cache and notify Vesta of the transaction result.
8. (Recommended) Clear the cache
Use the window.VestaDataCollector.clear() function to clear the cache once the transaction is complete. This ensures that window.VestaDataCollector.finalize() will start a new, unique transaction, and that a previous transaction will not be the target of a resume() call.
The window.VestaDataCollector.initiate() function calls clear() automatically.
9. Send Vesta the transaction status
Use the /transactions/transactionStatus endpoint to send Vesta any final details about the transaction. Whether a transaction is risky and you decide to cancel the order, or the transaction is safe and you decide to accept it, Vesta uses the final transaction status to improve our recommendations for your future transaction.
Send a PATCH request to the transactions/transactionStatus endpoint with the Order Number, the transaction ID, an Oder Status value and Payment Status in the body of the request. The Order Status field accepts the following values: Cancelled, Fulfilled, Paid, or Partially Paid. The Payment Status field accepts the following values: Captured, Declined, Issuer Declined, or Voided.
If you receive an access denied response at any point during the steps above, use the Refresh Token operation to generate a new Access Token/Refresh Token pair.