iOS Integration Guide
This page describes how to integrate Vesta’s iOS SDK into your iOS app project. During the integration, you will perform the following actions:
- Import the Library - Add Vesta’s libraries to your project.
- Initialize the Data Collector - Call the data collector start method to begin tracking your user’s behavior.
- Provide Location Data - If you choose to track your user’s location, send Vesta the latitude and longitude from the device.
- Implement Data Collector - Tag the UI elements of your application so that Vesta can watch them for indications of fraud.
- Track Shopping Cart Actions - Notify Vesta when you customer adds or removes items from the shopping cart.
- Evaluate the Transaction - Obtain a risk evaluation from Vesta and decide whether to submit the transaction for payment or cancel the transaction.
Download the Libraries
Click here to download the iOS SDK. If the download does not start automatically, on Windows, right click the link, or on Mac, hold the Control key and click the link. Then, select Save link as… from the menu that opens.
Import the Library
Import the library into your project in order to begin using the Vesta methods.
The steps below describe how to add the library files to your project:
-
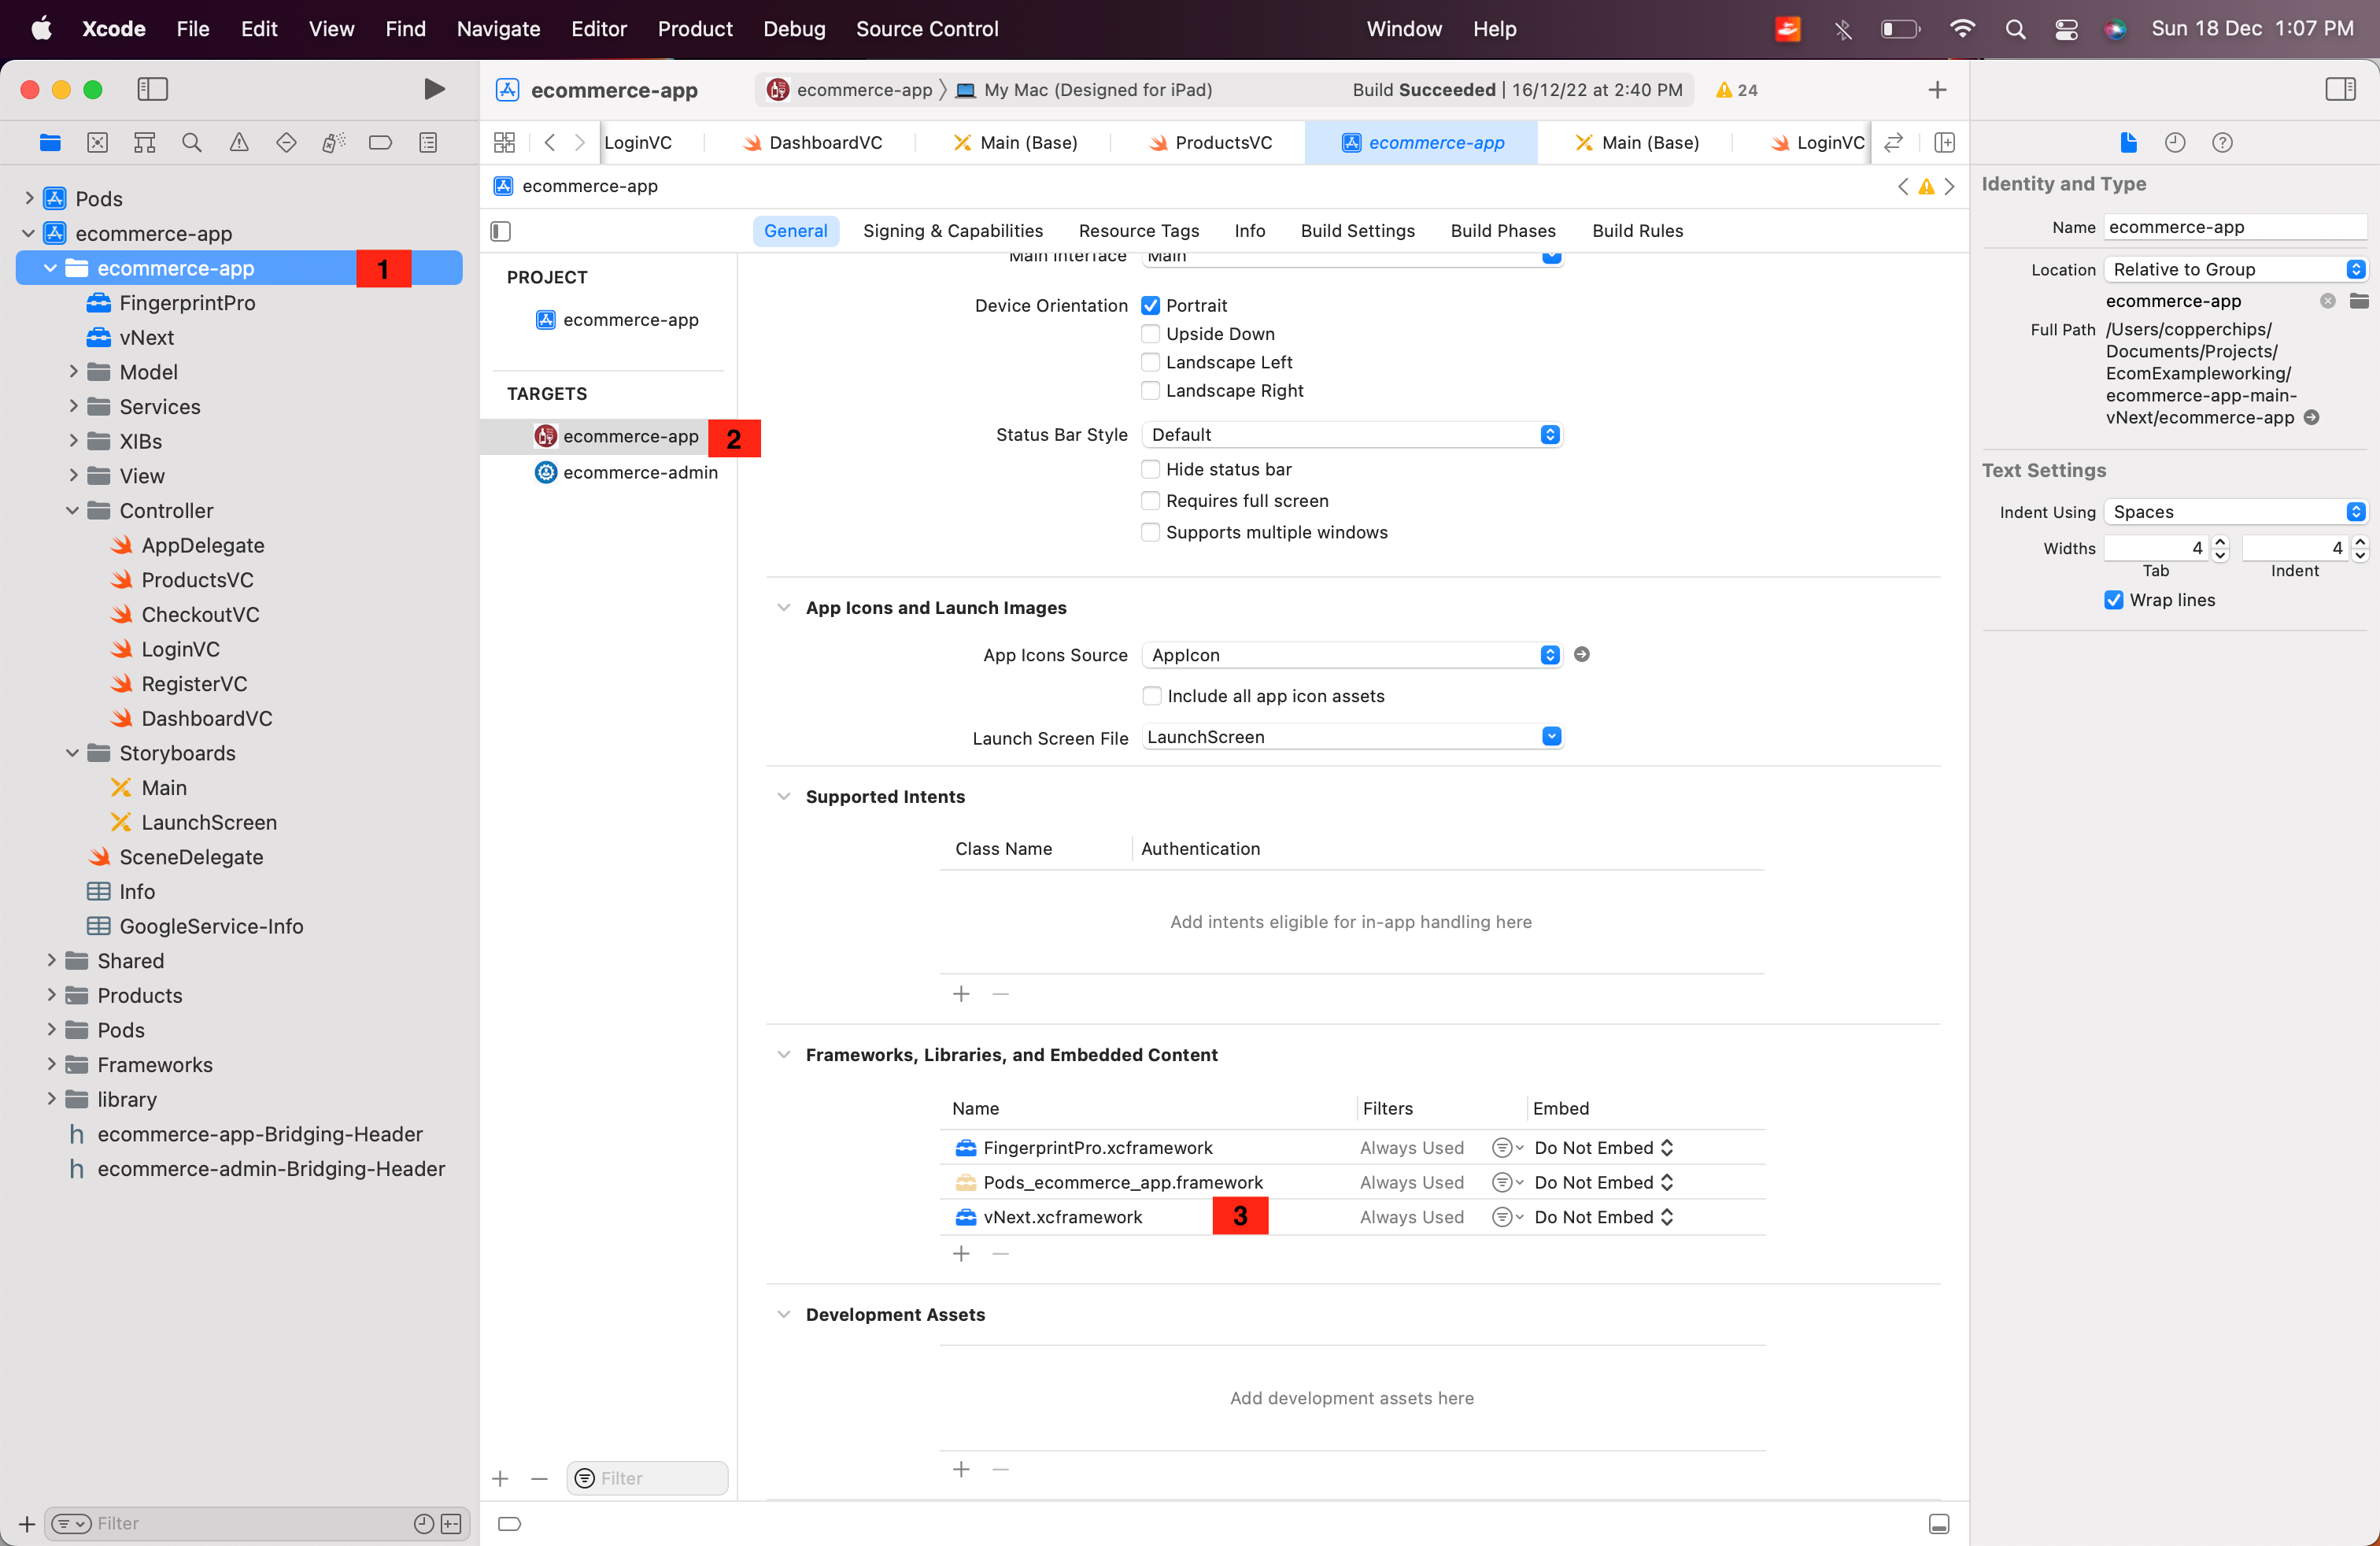
Add the library file, vNext.xcframework, to the project target where you want to use it. Be sure to select the “Copy items if needed” option.
-
Confirm that the framework was properly added to your project as shown in the image below:
-
Unzip the FingerprintPro.xcframework.zip file, and add it to you project as in step 1.
Now that the SDK is included in your project, you must complete the set up to initialize when your app launches.
Initialize the Data Collector
Initialize the Data Collector at the beginning of your app flow so that it can report the data that it tracks to Vesta.
At the beginning of your app flow, call the authenticateUser function to initialize the service. The function requires the following parameters:
| Parameter Name | Type | Description |
|---|---|---|
| UserName | String | Your Vesta account user name provided by Vesta Customer Success. |
| SecretKey | String | You secret key, obtained from the Vesta Console. |
| CustomerName | String | The customer name. |
| SandboxEnabled | Boolean | Set this value to true to use the sandbox environment. |
| Region | Enum | The region in which your business operates: US or APAC. |
The sample code below shows how to call the authenticateUser function:
import vNext

func initializeDataCollectorService() {

  DataCollectorService.default.authenticateUser(withUserName: "[email protected]", secretKey: "'c&D906L*4-3oBa", customerName: "Dharmbir Singh", sandboxEnabled: true, region: .US, completion: {
    transactionId in
    if !transactionId.isEmpty {
      print("Customer TransactionID==", transactionId)

    }

  })
}
Note: The user name and password are specific to the application environment. For development, use your sandbox credentials, then swap them with your production credentials when your app goes live.
The completion handler will return a transactionId which will be used in subsequent function calls. If the completion handler returns an empty transactionId field, the service did not initialize properly, and you should handle the error. If the problem persists, contact Vesta Customer Success.
Provide Location Data
If you choose to track your customer’s location, use the DataCollectorService.sendLocationData() method to send the latitude and longitude values from your user’s device to Vesta. Vesta uses the location data to augment our fraud detection and risk analysis. Tracking location data is optional. If you choose not to track location, proceed to the Implement Data Collector section.
The table below defines the parameters that you must pass to the DataCollectorService.sendLocationData() method:
| Parameter Name | Description | Type |
|---|---|---|
| latitude | The latitude value obtained from your customer’s device. | Double |
| longitude | The longitude value obtained from your customer’s device. | Double |
The code below provides an example of how to call the sendLocationData() method:
import vNext

func sendLocationToDataCollectorService() {
	// Previously obtained latitude<Double> from CoreLocation
	// Previously obtained latitude<Double> from CoreLocation

	DataCollectorService.default.sendLocationData(latitude: latitude, longitude: longitude) { (success) in
		if success {
            print("Location sent successfully")
		}
	}
}
Implement Data Collector
Our iOS integration supports different ways to implement tracking depending on the type of UI element:
- Text Fields - Track the text entered and time spent in text field elements in your app.
- Buttons - Track button taps for different events in your app.
- Pickers - Track the start and end time for when pickers are displayed.
- Active Screens - Track the time that your users enter and leave screens of your app.
In general, you can add tracked UI elements using Interface Builder or in your code by subclassing the standard UI components. The SDK provides an additional, unique class for tracking text fields, VestaTextWatcher.
Field Tags - When subclassing one of Vesta’s tracking elements from a standard element, you must use a tag value from the enums defined in the FieldTags.swift file. Any other tag values will cause a runtime error.
Text Fields
Text field tracking sends information to Vesta about how users interact with text fields in your app, which improves our fraud detection.
Implement text field tracking in your application using Interface Builder, directly in your code by setting the fieldTag property of your TrackingTextField objects or using the VestaTextWatcher class.
Interface Builder
To use Interface Builder to implement field tagging, follow the steps below for each of the UITextField objects in your application that you intend to track.
-
Open the Identity Inspector for the
UITextFieldobject that you want to tag. -
Set the class of the
UITextFieldtoTrackingTextField, and set the Module tovNextas shown in the image below.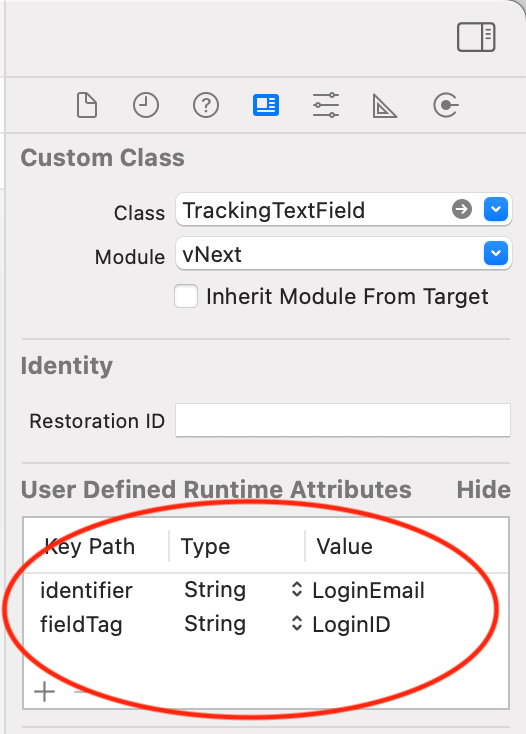
-
Open the Attributes Inspector for the
UITextFieldobject. You will see Identifier and Field Tag properties, which are defined by theTrackingTextFieldsubclass.Known Issues: Occasionally, Interface Builder will not display the custom properties of the
TrackingTextFieldin the Attributes Inspector. If this happens, define any necessary information in the Connections Inspector first. If you do not define the connections first, setting the class in the Identity Inspector may cause the connections to disappear from the list and you will not be able to set them. Once you have set the connections manually, you can assign the values in the Identity Inspector as described in the next step. -
Set the
fieldTagvalue in the Attributes Inspector, as shown in the image above. The value that you set forfieldTagmust correspond to one of the values provided by Vesta in the list of tracked fields.
Code
The information in this section describes how to set the fieldTag property on your TrackingTextField classes using code. Using code to implement field tagging is easier and less likely to cause bugs than using the Interface Builder. Follow the steps below for each of your TrackingTextField objects to implement field tagging in your code:
- Set the
fieldTagproperty of theTrackingTextFieldobject. - Access the enum values of the
TrackingTextFieldobject and cast them tostring rawValue.
The code below shows an example of tagging the user name and password fields as LoginID and Password:
import vNext

// You can use any default or convenience initializer

let emailTextField = TrackingTextField()
let passwordTextField = TrackingTextField()

emailTextField.fieldTag = FieldTags.LoginID.rawValue
passwordTextField.fieldTag = FieldTags.Password.rawValue
VestaTextWatcher
The VestaTextWatcher class makes it possible to track all UITextField elements, including UISearchBar, UITextView, and other UI elements that use any of these components, without having to subclass from TrackingTextField. The steps below describe how to use VestaTextWatcher:
- Make sure your UI subclasses conform to the
FieldTrackingProtocolby setting aFieldTagsvariable for each of them. - Create an instance of
VestaTextWatcherand callstartTracking()when you want to begin tracking user interaction. We recommend callingstartTracking()inviewWillAppear. - Call
stopTracking()on yourVestaTextWatcherinstance when you want to end user tracking, for example, when a screen is being dismissed or the customer is leaving your app. We recommend ending tracking inviewDidDisappear.
Note: We recommend creating an instance of VestaTextWatcher on each screen for better handling of tracking. Having a single instance for the entire application lifecycle may cause unexpected behavior.
Warning: Do not combine VestaTextWatcher with TrackingTextField subclassing in the same screen.
The code below provides an example of implementing VestaTextWatcher:
import vNext

class MyTextField: UITextField, FieldTrackingProtocol {
	// You can initialize it to None and change it to something trackable if needed
    var fieldTag: FieldTags = .None
}

class MySearchBar: UISearchBar, FieldTrackingProtocol {
	// You can initialize it to None and change it to something trackable if needed
    var fieldTag: FieldTags = .None
}

class MyOwnTextView: AnotherTextViewUIComponent, FieldTrackingProtocol {
	// You can initialize it to None and change it to something trackable if needed
    var fieldTag: FieldTags = .None
}

class ViewController: UIViewController {
    // VestaTextWatcher instance for this screen
    let vestaTextWatcher = VestaTextWatcher()

    @IBOutlet private weak var emailTextField: MyTextField!
    @IBOutlet private weak var passwordTextField: MyTextField!

    @IBOutlet private weak var mySearchBar: MySearchBar!

    @IBOutlet private weak var myTextView: MyOwnTextView!

    override func viewDidLoad() {
        super.viewDidLoad()
        // Do any additional setup after loading the view.

		// Setting the fieldTag property on the elements before startTracking so it works
        emailTextField.fieldTag = FieldTags.LoginID
        passwordTextField.fieldTag = FieldTags.Password

        mySearchBar.fieldTag = FieldTags.ProductSearch

        myTextView.fieldTag = FieldTags.BillingAddressLine1
    }

    override func viewWillAppear(_ animated: Bool) {
        super.viewWillAppear(animated)

		// We recommend having the startTracking function in the viewWillAppear function for better results
        vestaTextWatcher.startTracking()
    }

    override func viewDidDisappear(_ animated: Bool) {
        super.viewDidDisappear(animated)

		// We recommend having the stopTracking function in the viewDidDisappear function for better results
        vestaTextWatcher.stopTracking()
    }
}
Buttons
To track button taps in your app, subclass TrackingButton from the UIButton class in Interface Builder or directly in your code.
Interface Builder
To use Interface Builder to implement field tagging, follow the steps below for each of the UIButton objects in your application that you intend to track.
-
Open the Identity Inspector for the
UIButtonobject that you want to tag. -
Set the class of the
UIButtontoTrackingButton, and set the Module tovNext, as shown in the image below.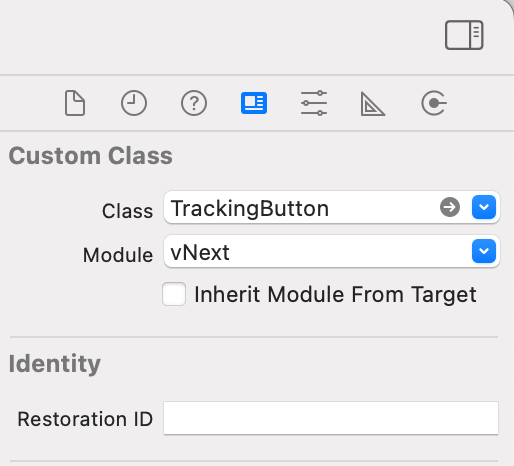
-
In your code, set the
trackingActionproperty to one of the values defined in theButtonTrackingAction.swiftfile. If you do not set the property to one of the specified values, it will cause a runtime error.
Code
To implement data collector for buttons using code, you must set the trackingAction property to one of the values defined in the ButtonTrackingAction.swift enum.
The code below shows an example of setting trackingAction property on a login button:
import vNext

class LoginViewController: UIViewController {

    @IBOutlet private weak var loginButton: TrackingButton!

    override func viewDidLoad() {
        super.viewDidLoad()

		loginButton.trackingAction = .LoginAttempt

		// You can also create the button with code using any default or convenience initializer

		let signUpButton = TrackingButton()
		signUpButton.trackingAction = .SignUp
    }
}
Note: If you do not want a button to be tracked but it still overrides from TrackingButton for some reason, you can use the ButtonTrackingAction value of None which will prevent the button from being tracked.
Pickers
To track the time a UIPickerView element is present on a screen of your app, subclass TrackingPickerView from the UIPickerView class in Interface Builder or in your code.
Interface Builder
To use Interface Builder to implement picker tracking, follow the steps below for each of the UIPickerView objects in your application that you intend to track.
-
Open the Identity Inspector for the
UIPickerViewobject that you want to tag. -
Set the class of the
UIPickerViewelement toTrackingPickerView, and set the Module tovNextas shown in the image below.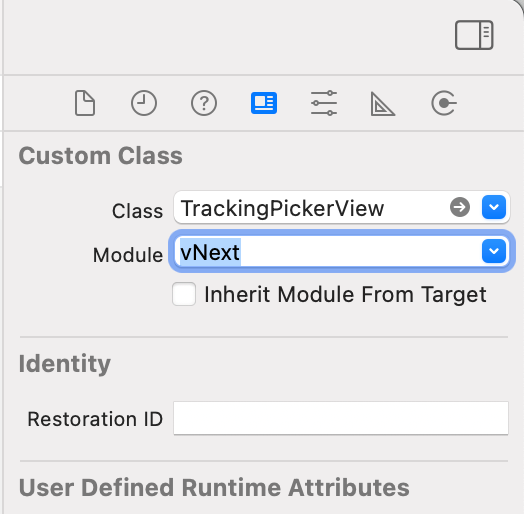
-
In your code, set the
fieldTagproperty to one of the values defined in theFieldTags.swiftfile. If you do not set the property to one of the specified values, it will cause a runtime error.
Code
To implement data collector for pickers using code, you must set the fieldTags property to one of the values defined in the FieldTags.swift enum.
The code below shows an example of setting the fieldTags property on an expiration date picker:
import vNext

class YourViewController: UIViewController {

    @IBOutlet private weak var pickerView: TrackingPickerView!

    override func viewDidLoad() {
        super.viewDidLoad()

		pickerView.fieldTag = FieldTags.PurchaseCardExpirationDateMonth.rawValue

		// You can also create the button with code using any default or convenience initializer

		let anotherPickerView = TrackingPickerView()
		anotherPickerView.fieldTag = FieldTags.PurchaseCardExpirationDateYear.rawValue
    }
}
Active Screens
Active screen tracking tracks user navigation in your app, including the time a user enters and leaves each screen. Follow the steps below to implement screen tracking:
- Subclass your
UIViewControllerfrom theEventsTrackerViewControllerclass. - Override the
screenTagproperty and return a value defined in theScreenTags.swiftenum.
The code below provides an example of how to implement screen tracking:
import vNext

class LoginViewController: EventsTrackerViewController {

    @IBOutlet private weak var loginButton: TrackingButton!

	override var screenTag: ScreenTags {
        return .Login
    }

    override func viewDidLoad() {
        super.viewDidLoad()

		loginButton.trackingAction = .LoginAttempt
	}
}
Track Shopping Cart Actions
Use the transactionEvent method to notify Vesta when your customer adds, updates, or removes items from the shopping cart. The trasactionEvent method takes product details, event type, and a completion handler as inputs and returns a transaction ID if the operation was successful.
The eventType parameter defines the cart action and takes one of the following values: add, update, or remove.
The code below shows adding an item to the cart:
let vestaManager = VestaManager()
vestaManager.transactionEvent(productCode: product.id, quantity: Cart.cartItem.count, normalAmount: product.productPrice, normalCurrencyCode: "USD", discountAmount: 0.0, discountCurrencyCode: "USD", giftCard: false, productType: "Virtual", uniqueCartID: "AIV90687S980SV", productDescription: product.productDescription, eventType: "add", completionHandler: {
  result in
  if !result.isEmpty {
    DispatchQueue.main.async {
      print("Transaction event == ", result)
    }
  }
})
Evaluate the Transaction
When your customer is ready to check out, use one of the transaction evaluation methods to obtain fraud analysis from Vesta. The results of the analysis depend on whether you are using Payment Guarantee or Payment Protect.
You can run one-step or two-step transaction evaluations.
One-step
For one-step transaction flows, send the transaction to your payment gateway for authorization, then use the completeTransactionPostAuth method to send transaction information to Vesta, as shown below:
if (authType == .OneStepPostAut) {
  let vesta = VestaManager()
  vesta.completeTransactionPostAuth(customData: [customData], uniqueCartID: "AIV90687S980SV", orderNumber: "70001", customerOrderStatus: "COMPLETE", totalAmount: totalAmout, discountAmount: discountAmount, payment: payments, shiping: [shiping], authType: authType, completionHandler: {
    result in

    self.showPostAuthResponse(result, authType: "OneStepPostAuth")
  })
}

func showPostAuthResponse(_ response: Result < vNext.CompleteTransactionResponse, vNext.ErrorModel > ) {

  switch response {
    case.success(let response):

      print("Post Auth EvaluationDecision = \(response.data?.evaluationDecision ?? "
        ")")
    print("Post Auth TransactionID = \(response.data?.transactionID ?? "
      ")")

    break

    case.failure(let error):
      print("Error Code =\(error.errorMessage ?? "
        ")")
    print("Error Message =\(error.errorMessage ?? "
      ")")
    break
  }
}
You will include the response from your payment gateway in the payment object in the parameters. Set the value of authType to OneStepPostAuth.
See the /transactions/evaluate/{transaction_id} definition in the API Reference for definitions of the values each parameter takes.
The result of the method depends on the Vesta product you are using:
- Payment Guarantee - You will receive a Guaranteed or Not Guaranteed decision in the result. You can choose whether to submit the transaction to your gateway for payment. If you submit a transaction that is Not Guaranteed for payment, Vesta will not cover the cost of any associated chargeback.
- Payment Protect - You will receive a score, insights, and a risk band, which you can use to determine whether to submit the transaction to your gateway for payment or cancel the transaction because it is too risky.
Two-step
For two-step transaction flows, submit the transaction to Vesta for analysis before submitting it to your gateway for authorization. Based on Vesta’s response, you can choose whether to submit the transaction for authorization. Once you have obtained an authorization decision from your gateway, submit the transaction to Vesta for analysis a second time, with the auth response included in the data. Vesta will return an updated decision that you can use to decide whether to submit the transaction for payment.
For the initial transaction analysis, use the completeTransactionPostAuthFallowedByPreAuth method, as shown below:
if authType == .PreAndPostAuth {
  let vesta = VestaManager()
  vesta.completeTransactionPostAuthFallowedByPreAuth(customData: [customData], uniqueCartID: "AIV90687S980SV", orderNumber: "90003", customerOrderStatus: "COMPLETE", totalAmount: totalAmout, discountAmount: discountAmount, payment: payments, shiping: [shiping], completionHandler: {
    (response) in

    switch response {
      case.success(let response):

        print("EvaluationDecision = \(response.data?.evaluationDecision ?? "
          ")")
      print("TransactionID = \(response.data?.transactionID ?? "
        ")")

      break

      case.failure(let error):
        print("Error Code =\(error.errorCode ?? "
          ")")
      print("Error Message =\(error.errorMessage ?? "
        ")")

      break
    }
  })
}
Set the authType to PreAndPostAuth.
See the /transactions/evaluate/{transaction_id} definition in the API Reference for definitions of the values each parameter takes.
The response depends on your subscription:
- Payment Guarantee - You will receive a Guaranteeable or Not Guaranteed decision in the result. You can choose whether to submit the transaction to your gateway for authorization.
- Payment Protect - You will receive a score, insights, and a risk band, which you can use to determine whether to submit the transaction to your gateway for authorization or cancel the transaction because it is too risky.
If you submit the transaction for authorization, call the completeTransactionPostAuthFallowedByPreAuth again and include the authorization response in the parameters to obtain an updated fraud analysis. Include the auth result in the payment object in the parameters.
The method will return an updated analysis result based on your subscription:
- Payment Guarantee - You will receive a Guaranteed or Not Guaranteed decision in the result. You can choose whether to submit the transaction to your gateway for payment. If you submit a transaction that is Not Guaranteed for payment, Vesta will not cover the cost of any associated chargeback.
- Payment Protect - You will receive an updated score, insights, and a risk band, which you can use to determine whether to submit the transaction to your gateway for payment or cancel the transaction because it is too risky.
Logs
When working with the Data Collector framework, logs are disabled by default. You can enable logs for each of the objects described in the sections above by setting the showLogs static variable to true. For TrackingTextField objects, you can enable and disable logs on a per object basis. The code below shows how to enable logs using the different approaches:
import DataCollector

// Enables logs for DataCollectorService
DataCollectorService.showLogs = true

// Enables logs for this TrackingTextField
let trackingTextField = TrackingTextField()
trackingTextField.showLogs = true

// Enables logs for ALL TrackingTextField instances (bypasses instance showLogs var)
TrackingTextField.showLogs = true
Tag reference
Field Tags
| Field Tag | Description |
|---|---|
| None (v1.4.0) | Used to tag a field that should not be tracked, but that has been subclassed from the Vesta tracking class. |
| LoginID | The user name field of your login form. |
| Password | The password field of your login form. |
| ProductSearch | The text field used to search for products. |
| AddToCart | The button used to add a product to the shopping cart. |
| RemoveFromCart | The button used to remove a product from the shopping cart. |
| TransferRecipient | The text field used to identify the recipient of a transfer payment. |
| TransferSender | The text field used to identify the sender of a transfer payment. |
| TransferToAccount | The text field used to identify the account that will receive the funds from a transfer payment. |
| TransferAmount | The text field used to define the amount of a transfer payment. |
| TransferDate | The text field used to define the date that a transfer payment should be made. |
| BillingFirstName | The text field used to collect the first name of the cardholder. |
| BillingLastName | The text field used to collect the last name of the cardholder. |
| BillingAddressLine1 | The text field used to collect the first line of the cardholder’s billing address. |
| BilllingAddressLine2 | The text field used to collect the second line of the cardholder’s billing address. |
| BillingCity | The text field used to collect the city portion of the cardholder’s billing address. |
| BillingRegion | The text field used to collect the region of the cardholder’s billing address. |
| BillingPostalCode | The text field used to collect the postal code of the cardholder’s billing address. |
| BillingCountryCode | The text field used to collect the country code of the cardholder’s billing address. |
| PurchaseCardNumber | The text field used to collect the customer’s payment card number. |
| PurchaseCardExpirationDateFull | The text field used to collect the expiration date of the customer’s payment card. |
| PurchaseCardExpirationDateMonth | The text field used to collect the month portion of the expiration date of the customer’s payment card. |
| PurchaseCardExpirationDateYear | The text field used to collect the year portion of the expiration date of the customer’s payment card. |
| PurchaseCardCVV | The text field used to collect the CVV number associated with the customer’s payment card. |
| PurchaseAlternateAccount | The text field used to define an alternate payment method for the purchase. |
| DeliveryMethod | The UI element used to select the shipping method. |
| DeliveryRecipient | The text field used to collect the name of the person who will receive the shipment. |
Tracking Actions
| Tracking Action | Description |
|---|---|
| None (v1.4.0) | Used to tag a button that should not be tracked, but that has been subclassed from the Vesta tracking class. |
| LoginAttempt | Start this event when your customer clicks the login button. |
| ForgotPassword | Start this event when your customer clicks a button to attempt a password reset. |
| SignUp | Start this event when your customer clicks the button for creating a new account. |
| SignUpAttempt | Start this event when your customer clicks the button for creating a new account, but the credentials have not yet been validated. |
| Search | Start this event when your customer activates the search field or clicks the button to perform a search. |
| AddToCart | Start this event when your customer clicks the button to add a product to the shopping cart. |
| RemoveFromCart | Start this event when your customer clicks the button to remove a product from the shopping card. |
| ShowCart | Start this event when your customer clicks the button to view the contents of the shopping cart. |
| ProceedToCheckout | Start this event when your customer clicks the button to begin the checkout process. |
| ConfirmPaymentMethod | Start this event when your customer clicks the button to confirm the payment method. |
| ConfirmShippingMethod | Start this event when your customer clicks the button to confirm the shipping method. |
| CompleteOrder | Start this event when your customer clicks the button to complete the order. |